Set up a Ticket
Here you will learn how to setup a ticket for the event you are creating.
This is where you will setup the ticket for the event you are creating. If you have not started the process of creating an event, you can learn how to: Create an Event.
Prerequisites
Before diving in, ensure you have the following in place if needed:
- Ticket Purchase: If attendees need to purchase a ticket for your event, you must Create a Payment for the Event beforehand.
- Registration: If attendees need to fill out a registration form, ensure you Create a Form first.
Types of Tickets
There are three types of tickets you can create for your event:
- Basic Tickets: These tickets will just ask the user for the number of ticket they want to get.
- Name Tickets: These tickets will ask the user for the number of tickets they want to get and the name of the person who will be using each ticket.
- Form Tickets: These tickets will have the user fill out a form before they can get the ticket.
Each type of ticket can have a ticket criteria attached to it. Also, if you need a payment for the ticket you can attach a payment to the ticket as needed.
Basic Tickets
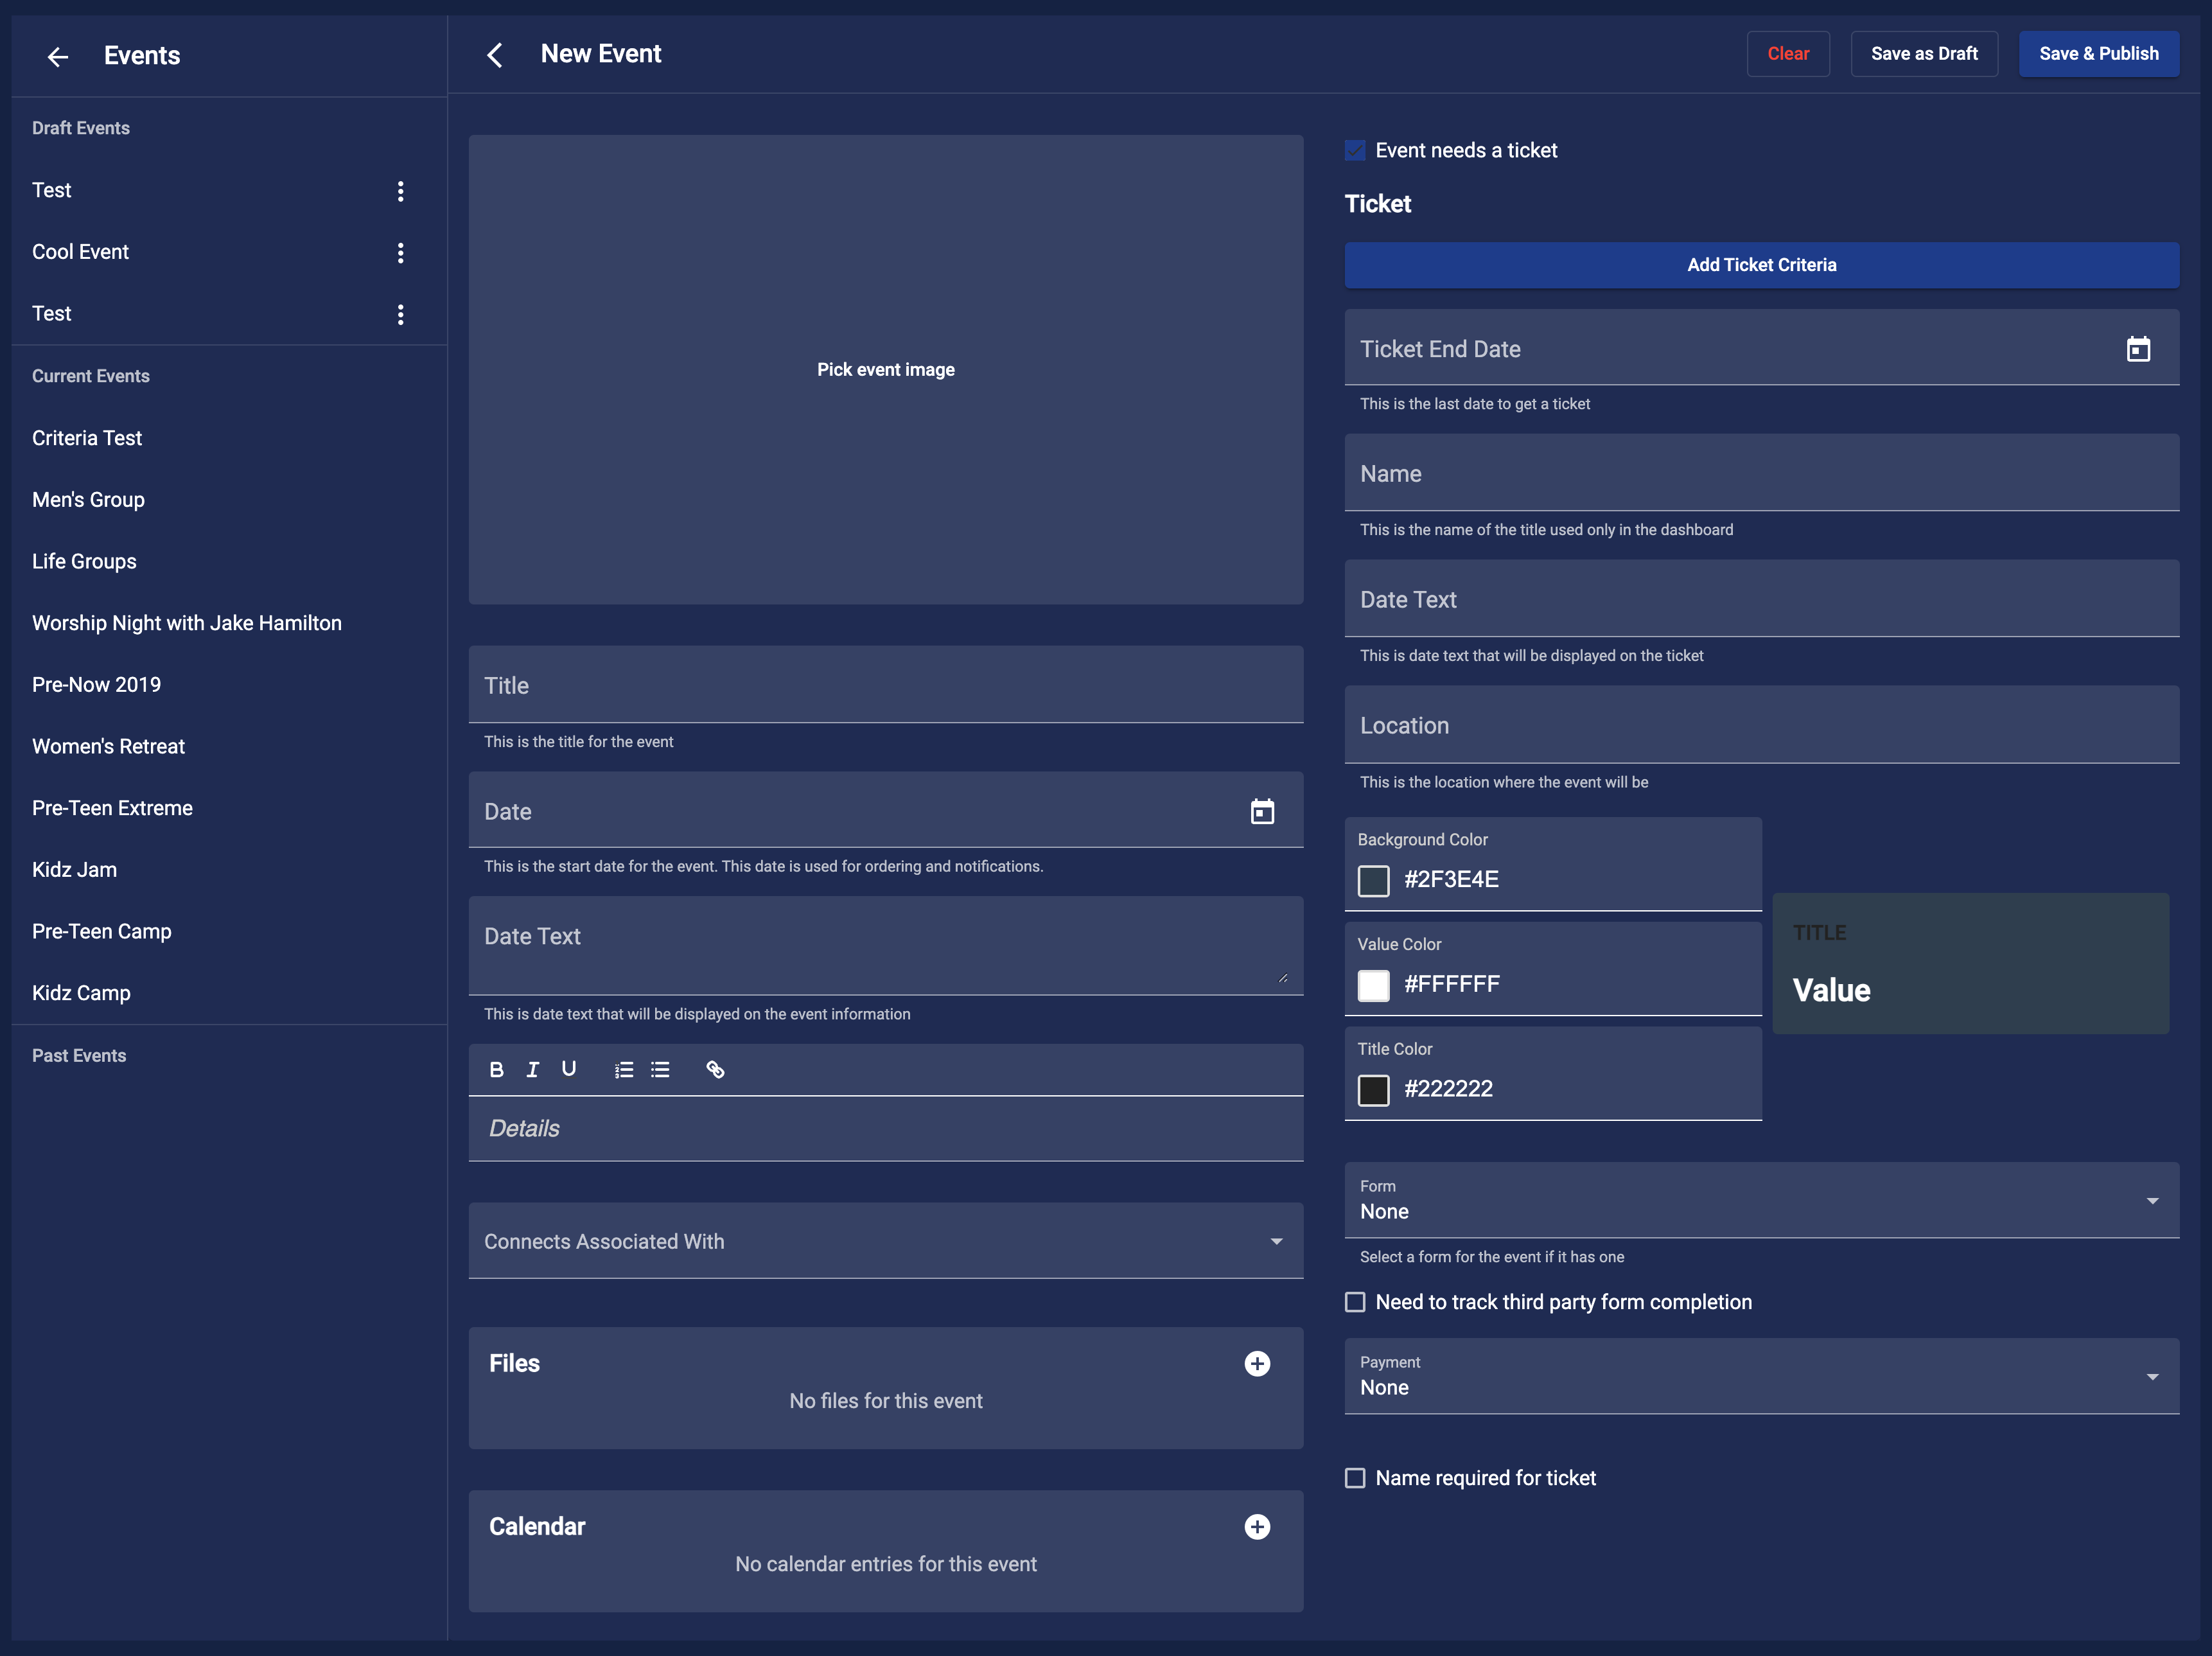
Basic tickets are the easiest to setup. All you need to do is enter the following information.
- Ticket End Date: This is the last date that people can get tickets for this event. If you need to change the date later you can do so. Follow the Update an Event guide to learn how to do that.
- Ticket Name: This is the name of the ticket. It will only be displayed to you in the dashboard.
- Date Text: This is the date that will be displayed to the user when they are looking at their ticket.
- Location: This is the location of the event. It will be displayed to the user at the bottom of their ticket.
Next is the ticket colors. You get to pick three color:
- Background Color: This is the color of the background of the ticket.
- Value Color: This is the color of the field value on the ticket.
- Title Color: This is the color of the field title on the ticket.
You can use the color picker or just type in your color code (hex code i.e. #FFFFFF). Once you have selected your colors you can add a payment and or ticket criteria to the ticket. Go to the Ticket Criteria section to learn more about that or go to the Payment section to learn how to add a payment to the ticket.
Name Tickets
Name tickets are just as easy to setup as basic tickets. All you need to do is enter the following information along with checking the checkbox at the bottom call Name required for ticket.
- Ticket End Date: This is the last date that people can get tickets for this event. If you need to change the date later you can do so. Follow the Update an Event guide to learn how to do that.
- Ticket Name: This is the name of the ticket. It will only be displayed to you in the dashboard.
- Date Text: This is the date that will be displayed to the user when they are looking at their ticket.
- Location: This is the location of the event. It will be displayed to the user at the bottom of their ticket.
Next is the ticket colors. You get to pick three color:
- Background Color: This is the color of the background of the ticket.
- Value Color: This is the color of the field value on the ticket.
- Title Color: This is the color of the field title on the ticket.
You can use the color picker or just type in your color code (hex code i.e. #FFFFFF). Once you have selected your colors you can add a payment and or ticket criteria to the ticket. Go to the Ticket Criteria section to learn more about that or go to the Payment section to learn how to add a payment to the ticket.
Form Tickets
Name tickets are just as easy to setup as basic tickets. All you need to do is select your form from the Form selection dropdown. Make sure you do not check the checkbox at the bottom called Name required for ticket.
- Ticket End Date: This is the last date that people can get tickets for this event. If you need to change the date later you can do so. Follow the Update an Event guide to learn how to do that.
- Ticket Name: This is the name of the ticket. It will only be displayed to you in the dashboard.
- Date Text: This is the date that will be displayed to the user when they are looking at their ticket.
- Location: This is the location of the event. It will be displayed to the user at the bottom of their ticket.
Next is the ticket colors. You get to pick three color:
- Background Color: This is the color of the background of the ticket.
- Value Color: This is the color of the field value on the ticket.
- Title Color: This is the color of the field title on the ticket.
You can use the color picker or just type in your color code (hex cod i.e. #FFFFFF). Once you have selected your colors you can add a payment and or ticket criteria to the ticket. Go to the Ticket Criteria section to learn more about that or go to the Payment section to learn how to add a payment to the ticket.
Ticket Criteria
Ticket criteria allows you to add a criteria that needs to be meet to get a ticket. If a user tries to get a ticket and they do not meet the criteria they will not be able to get a ticket. If they do need to get a ticket for the event you can get them on in the dashboard. Go to the Event Ticket guide to learn how to do that.
Setup
Criteria currently only have one domains available which is Groups. Click on Add Ticket Criteria to add a criteria to the ticket. From here select your domain and then select the rule you want for that domain. Bellow is a breakdown of the rules for each domain.
Domain Types
| Rule | Description |
|---|---|
| Member of any group | The user only has to be a member of any of the groups you have active in your organization. |
| Member of select groups | The user has to be a member of the groups you have selected. |
| Attended any group at least | The user has to have attended any of the groups you have active in your organization at least the number of times you set. |
| Attended select groups at least | The user has to have attended the groups you have selected at least the number of times you set. |
| Any group attendance, miss no more than | The user has to have attended any of the groups you have active in your organization and missed no more than the number of times you set. |
| Select group attendance, miss no more than | The user has to have attended the groups you have selected and missed no more than the number of times you set. |
| Perfect attendance for any group | The user has to have perfect attendance for any of the groups you have active in your organization. |
| Perfect attendance for select groups | The user has to have perfect attendance for the groups you have selected. |
You will need to complete all required field for the rule you have selected. These field include:
- Groups: This is where you select the groups you want to use for the rule.
- Meeting Frequency: This is the frequency of the meeting for the groups. Options include:
Weekly,Bi-Weekly,Monthly. - Number of attendances: This is the number of attendances the user needs to meet for the rule your selected. This will be the minium or maximum number for the rule.
- Time frame: This will have a start and end date to be selected. This is the time frame used to calculate the number of attendances the user has meet for the rule you have selected.
Now that you have all of the fields completed, you can click Save. If you change your mind you can click Cancel to cancel the criteria. Once you click Save you will see a criteria card appear where the Add Ticket Criteria button was. The card will have a readable paragraph of the criteria that you have setup with a badge that indicates the domain you have selected. If you need to remove or change the criteria you can click on the Remove button on the card. Then click the Add Ticket Criteria button.
Payment
If the ticket need a payment you can add your payment to the ticket by selecting it from the Payment selection dropdown. If you want to learn more about event payments you can go to the Create Event Payment guide. Once you save the event you can not unlink the payment but you can update it. Learn more about this process in the Update Event Payment guide.
Finalize
Once you have completed all the steps for your ticket type and needs you are done. There is one more checkbox for Need to track third party form completion. If you need to track form complete for the event location that is out side of your organization, you can check this box. When you do this, there will be a new column in the table for purchased tickets in the Event Ticket View in the dashboard. You can learn more in the Event Ticket guide.
When you are done head back to the Create Event guide to finish creating your event. If you do not like what you have entered just click the "Clear" button to start over.